Product & Features
What is LZRvision?
+LZRvision is an AI-powered laser projection system for climbing walls. It projects your selected climbing routes directly onto the wall, highlighting exactly which holds to use. No more tape, no more confusion – just pure climbing focus.
Which climbing apps does LZRvision work with?
+LZRvision currently integrates with the Crux climbing app. We chose Crux for its excellent route-setting features and active community. Future app integrations may be added based on user demand.
How accurate is the projection?
+LZRvision uses advanced computer vision to detect and match holds on your wall with pinpoint accuracy. The laser projection is precise enough to highlight individual holds, even on densely packed walls.
Where is the optimal projector placement?
+For the best results, placing it straight back at the mid-height of the wall, or slightly lower, provides optimal coverage and minimal error. For a typical 8x12 foot wall (standard kilter/moon/tension size), the projector needs to be about 8 feet back from the top of the wall to cover its entirety. Projection still works well if placed off-center or to the side to increase wall coverage in smaller space, but some minor calibration adjustments may be needed during initial setup.

Mid-height or low placement works best. Avoid ceiling-height mounting and extreme side angles (>30°).
Can I move the projector after setup?
+Yes, but you'll need to reboot the device after moving it. A simple restart takes 20-30 seconds and it will be good to go at the new location. Note that very wide skew angles, or big changes in projector position can in some cases invalidate calibration and require some minor adjustment to achieve high accuracy.
Is shadowing a problem?
+Shadowing has shown to be less of an issue than initially expected. Being able to visualize the climb prior to starting plus seeing upcoming holds are the main requirements for effective use. Naturally, shadowing by the climber's body does occur, and will remain a factor during climbing. Two (or more) projectors can be used to reduce shadowing effects by providing multiple angles of projection.
Can my friends use it?
+Yes! Once activated for a home wall or gym, any Crux user can change the active climb, no additional setup or logins required. It's perfect for sharing the fun with family and friends.
Where is it made?
+This product is fully designed and assembled in the USA, with components sourced globally to ensure the highest quality and performance standards.
It's a laser beam. Is it safe?
+The laser used in this product complies with Class 3R laser safety requirements under applicable international standards (such as IEC 60825). Class 3R lasers are considered low risk when used as intended, but direct eye exposure to the beam should be avoided. As with any laser device, do not stare into the beam, keep out of reach of children, and power off the device when not in use.
Setup & Technical
How long does setup take?
+Initial setup typically takes about 5-10 minutes. Once configured, the device remembers your settings and is ready to use immediately after powering on. An optional calibration step can be performed to fine-tune the projection for your specific wall, see manual calibration below.
What size walls does it work with?
+LZRvision is designed primarily for home walls and small gym setups. It works best on walls up to approximately 12 feet wide and 12 feet tall, at any angle, though this can vary based on projector placement, room configuration and lighting. Larger walls can easily be projected by placing the projector further back, at the expense of some image brightness.
What are its dimensions?
+The device measures 13x13x9 cm, or about the size of a grapefruit, making it compact enough to fit on most tripods or shelves.
Do I need any special equipment?
+You'll need a standard power outlet and a 2.4GHz WiFi network. We highly recommend using a tripod (not included) for optimal positioning and stability.
How quickly does it project routes?
+The first route or routes with new background images take 15-20 seconds to project. Subsequent routes on the same wall image project in just 2-4 seconds.
Configuration Options
Is there user configuration available?
+Yes! LZRvision includes a comprehensive settings panel with several user-configurable options to optimize the projection for your specific wall and lighting conditions. You can adjust draw styles, wobble effects, calibration methods, FPS, and more—all from an easy-to-use interface.
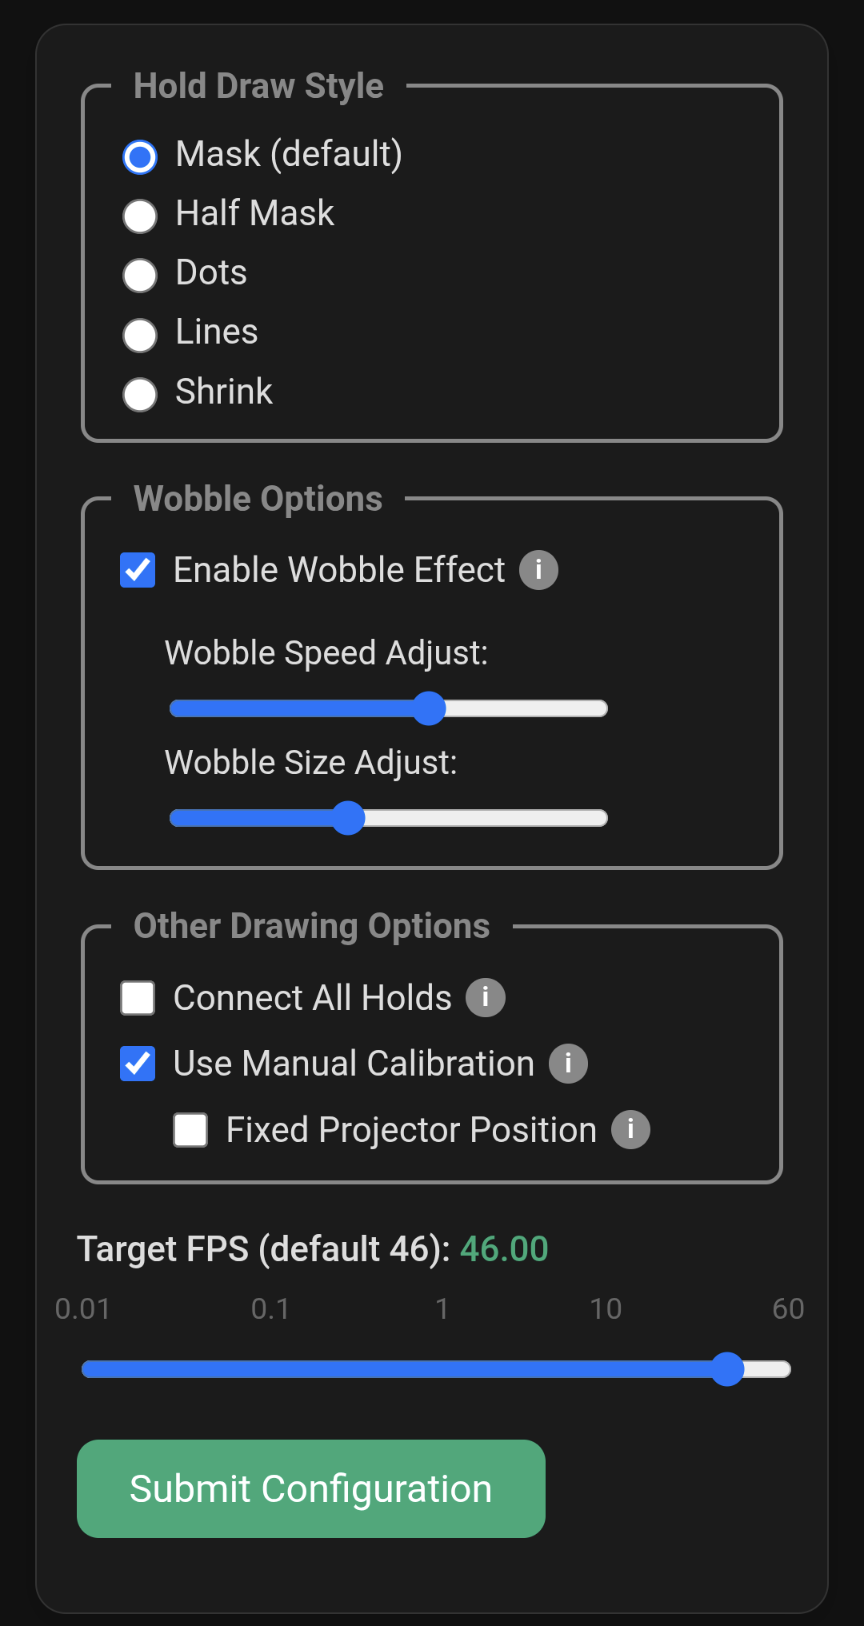
What draw styles are available?
+LZRvision offers 5 different hold draw styles to suit your preference. Draw style is the shape of the laser projection on or around each hold
- Mask (default) - Highlights holds with a solid colored outline
- Half Mask - Partial overlay for better visibility of hold details
- Dots - Small dots under each hold for minimal obstruction and maximum overall brightness
- Lines - Short lines under each hold, think underscore
- Shrink - Reduced mask size, can make holds more visible in certain lighting conditions
What is the wobble effect?
+The wobble effect adds subtle movement to the projected holds, which significantly improves visibility in bright rooms or gym environments. You can enable it and adjust both the wobble speed and size to find the perfect balance for your space.
What is manual calibration and when should I use it?
+Manual calibration is an optional process where you manually verify hold positions to maximize projection accuracy. It takes 5-20 minutes depending on wall size. After completing manual calibration, enable the "Use Manual Calibration" config and optionally "Fixed Projector Position" (if your projector is permanently mounted) to apply these adjustments for maximum speed and accuracy (caveats below).
The adjusted holds can be saved and re-edited at any point, allowing you to refine your calibration over time.
Interpolation Method
This adjustment uses a technique called RBF Interpolation to intelligently adjust hold positions across your entire wall based on just a few reference points you verify. Instead of manually adjusting every single hold, you only need to correct a few holds, typically 10-15+ across your wall. The interpolator then smoothly adjusts all other holds based on the calibration points you've provided.
Note: It is just as important to accept a few "good" holds as it is to correct bad ones
Example: Interpolation (Before → After)

You calibrate just 6 holds (red circles). The interpolator smoothly shifts all holds to match your corrections, creating a trapezoidal transformation on the bottom while leaving the top half unchanged.
The more holds you calibrate, the more accurate your wall becomes.
Two Calibration Modes
Standard Mode (Recommended for most users):
This is the normal way to use manual calibration. You correct just a handful of holds across your wall. New holds and all uncalibrated holds will automatically adjust to match their nearest neighbors, ensuring consistency across the wall. This mode works excellently even if your projector gets bumped slightly or moved on a tripod between sessions—new holds will simply calibrate to their local neighbors.
Fixed Projector Mode (Only if needed):
Only use this mode if standard manual calibration isn't giving you the accuracy you need AND your projector is permanently fixed in position without any new holds being added to your wall. This mode requires you to manually calibrate every single hold on your wall (rather than just a handful), as there are no neighbor-based adjustments. Use this only as a last resort for maximum precision in fixed setups. If you reset your wall, or add holds, you'll need to repeat the calibration process if you want to keep using this mode.
Example: Fixed Projector Mode (Before → After)

Only those specific holds are moved to match your corrections (purple). All other holds remain in their original detected positions.
When to Use Each Mode
Use Standard Mode for most setups. It's robust to minor projector movements and only requires calibrating a handful of holds.
Use Fixed Projector Mode only if you need more accuracy than standard mode provides, your projector is permanently fixed, and you don't mind calibrating every hold on your wall.
What is the FPS setting?
+FPS (Frames Per Second) controls how frequently the projector updates its output. The default is 46 FPS, which provides smooth, responsive projection. Higher values tend to draw smoother lines but can decrease accuracy at the extremes. Lower values increase accuracy at the expense of eventual flickering. Most users should leave this at the default.
Purchasing & Shipping
When will LZRvision be available?
+LZRvision is coming soon to Kickstarter! Sign up on our homepage to be notified when the campaign launches and get access to exclusive early-bird pricing.
How much will it cost?
+Final pricing will be announced with our Kickstarter launch, though a primary goal of this project is to remain in the affordable range for home-wall enthusiasts. Early-bird backers will receive special discounted pricing. Sign up for our newsletter to be the first to know!
Do you ship internationally?
+Yes! We plan to ship internationally. Shipping availability, cost and delivery time will vary by region. Details will be provided during the Kickstarter campaign.
Support
What if I have problems with my device?
+Check out our Setup Instructions page for troubleshooting tips. If you still need help, use our Contact Form and we'll get back to you as soon as possible.
Is there a warranty?
+Yes, LZRvision comes with a 1-year manufacturer warranty covering defects in materials and workmanship.